主题
apptrace_flutter_plugin接入指南
一、SDK 安装
1.1 添加依赖
在项目的pubspec.yaml文件中添加以下内容:
yaml
dependencies:
  apptrace_flutter_plugin: ^1.1.8
1.2 插件安装
通过命令行安装
cmd
flutter pub get二、配置 appKey
请先从AppTrace控制台获取AppKey
2.1 Android配置方式
- 找到项目中的AndroidManifest.xml文件,在
<application>...</application>中添加以下配置
html
<meta-data
    android:name="cn.apptrace.APP_KEY"
    android:value="AppTrace管理平台分配的key"/>
2.2 iOS配置方式
- 在 Info.plist 文件中配置
html
<key>cn.apptrace.appKey</key>
<string>AppTrace管理平台分配的key</string>
三、初始化 SDK
dart
import 'package:apptrace_flutter_plugin/apptrace_flutter_plugin.dart';

ApptraceFlutterPlugin _apptraceFlutterPlugin = ApptraceFlutterPlugin.getInstance();
_apptraceFlutterPlugin.init(enableClipboard: true);
四、功能集成
1、获取应用安装时携带的参数
在 APP 需要安装参数时(由 web 网页中传递过来的,如邀请码、游戏房间号等动态参数),调用 getInstall 函数,在回调中获取参数
dart
_apptraceFlutterPlugin.getInstall(_getInstallHandler);

Future _getInstallHandler(Map<String, String> data) async {
    setState(() {
      result = "getInstallTrace result:\n\n code = ${data['code']}, msg = ${data['msg']}, paramsData = ${data['paramsData']}";
    });
}
2、获取一键拉起携带的参数
2.1 开启一键拉起功能
iOS开启
登录 AppTrace 的管理后台,找到 iOS 集成配置,开启相关功能,参考下图所示。其中 Team Id 可以在 Apple 开发者后台查看。 
Android开启
登录 AppTrace 的管理后台,找到 Android 集成配置,开启相关功能,参考下图所示。 
2.2 代码配置
iOS配置
开启 Associated Domains 服务
在 xcode 中所示位置配置 AppTrace 后台提供的关联域名 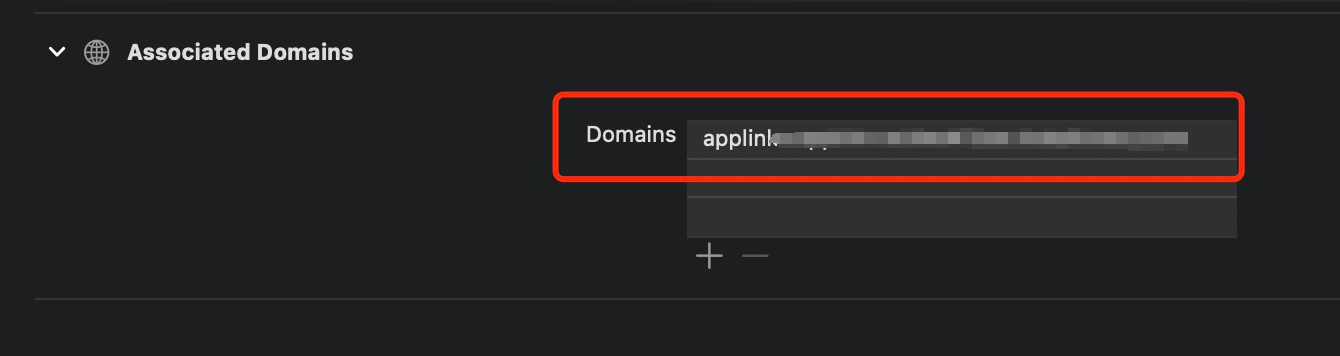
Android配置
找到项目中AndroidManifest.xml文件和需要被调起的Activity, 参考以下配置Scheme
html
<application
        android:label="apptrace_flutter_plugin"
        android:name="${applicationName}"
        android:icon="@mipmap/ic_launcher">
       <meta-data
           android:name="cn.apptrace.APP_KEY"
           android:value="AppTrace平台分配的appKey"/>
        <activity
            android:name=".MainActivity"
            android:exported="true"
            android:launchMode="singleTop"
            android:theme="@style/LaunchTheme"
            android:configChanges="orientation|keyboardHidden|keyboard|screenSize|smallestScreenSize|locale|layoutDirection|fontScale|screenLayout|density|uiMode"
            android:hardwareAccelerated="true"
            android:windowSoftInputMode="adjustResize">
            <!-- Specifies an Android theme to apply to this Activity as soon as
                 the Android process has started. This theme is visible to the user
                 while the Flutter UI initializes. After that, this theme continues
                 to determine the Window background behind the Flutter UI. -->
            <meta-data
              android:name="io.flutter.embedding.android.NormalTheme"
              android:resource="@style/NormalTheme"
              />
            <intent-filter>
                <action android:name="android.intent.action.MAIN"/>
                <category android:name="android.intent.category.LAUNCHER"/>
            </intent-filter>
            <intent-filter>
                <action android:name="android.intent.action.VIEW"/>
                <category android:name="android.intent.category.DEFAULT"/>
                <category android:name="android.intent.category.BROWSABLE"/>
                <data android:scheme="AppTrace分配的Scheme"/>
            </intent-filter>
        </activity>
        <!-- Don't delete the meta-data below.
             This is used by the Flutter tool to generate GeneratedPluginRegistrant.java -->
        <meta-data
            android:name="flutterEmbedding"
            android:value="2" />
    </application>
2.3 代码集成
调用 registerWakeUp 函数,在回调中获取参数
dart
_apptraceFlutterPlugin.registerWakeUp(_registerWakeUpHandler);

Future _registerWakeUpHandler(Map<String, String> data) async {
    setState(() {
      result = "wakeupTrace result:\n\n code = ${data['code']}, msg = ${data['msg']},  paramsData = ${data['paramsData']}";
    });
}